SOURCE CONTROL
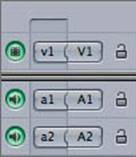
-- The SOURCE CONTROL indicators are the V1, A1 and A2 icons at the very left end of the TIMELINE window.
We briefly touched on the “Source Control” options in the previous tutorial when talking about adding clips to the Timeline and using multiple Video tracks.
 If you recall, the V1 track was automatically linked to the A1 and A2 tracks (and V2 was linked to A3 and A4). This is the default but, as I mentioned then, you can manually control these yourself.
By clicking on the source controls (v1, a1, a2 etc), you can separate them from their respective Video and Audio tracks. These source controls determine WHICH track your video and audio will end up on or if the video and audio will appear in the Timeline at all. You can move these controls to other tracks, or disconnect them all together.
![]()
If you DISCONNECT any of them prior to making an edit, you will have NO clip placed into that track. For example, if you disconnect both of the AUDIO SOURCE CONTROLS, then ONLY video will be added to your timeline when you make your edit. Conversely, if you completely disconnect the Video, you’ll only have the audio appear in the Timeline.
Additionally, you can drag these 'source controls' around and connect these to different tracks so the VIDEO of your clip might overwrite another video clip, but the AUDIO will go to completly different tracks and NOT overwrite the other audio.
NOTE: These source controls are very important when you’re using the overwrite and insert buttons or the edit overlay because the location of the source controls will determine which tracks are used for your added video and audio.
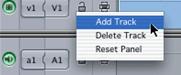
NOTE: Previously you created additional Video tracks (V2) by dragging your clip into the Timeline and placing where there were previously no tracks visible. You can manually create additional audio and video tracks by holding the “control” button on your keyboard and clicking with your mouse in the 'track area' at the far left and a small popup menu will allow you to add or delete tracks.
Play with these source controls along with the “edit overlay” to overwrite and insert clips.
Familiarize yourself with how these work because, in the future, you may be working with audio.
If you are just testing them out and are not planning on actively using them, make sure you put them back or, at the very least, make sure that they are reconnected to a track. If you mess around with them and leave them disconnected from any tracks, you may be frustrated later when none of your audio is showing up as you add clips to the timeline.